Automated CPI Deployments
Release Pipelines
Release Pipelines enables you to orchestrate deployments into SAP environments with right approvals in place.
Release Pipeline can be created with one or more stages. Each stage will correspond to automated deployment to the required SAP environment with a sequence of activities such as tasks related to approvals, manual changes, deployments, callouts and tests execution.
Note: You can create a multi-stage pipeline for continuous deployment across various environments one after the other towards continuous delivery of application all through Dev - QA - Staging - Production.
Creating a Release Pipeline
Creating a Release Pipeline is a six-step process.
| Step1 | Enter a name in Release Pipeline Name |
| Step2 | Choose Pipeline Type – SAP CPI from the drop down |
| Step3 | The project that we are currently working on is displayed by default and is non editable. |
| Step4 | Click Add Stages, add the stages. Add various types of pre, post and deployment tasks on need basis. |
| Step5 | Choose to schedule the pipeline execution or run manually |
| Step6 | Specify the email ids to receive notifications about release pipeline execution status. |
For creating release pipeline:
Select the required CPI Project and in Release go to Release Pipelines.

1. Click Create New Release Pipeline.
2. Release Pipeline Name: Give a name for the release pipeline.

3. Pipeline Type: Choose SAP CPI from the dropdown.

4. Artifact Source: The project that we are currently working on is displayed by default and is non editable

5. Add Stages: Click Add Stage.

Enter the stage name say for e.g., UAT or QA where the deployment has to be carried out and click OK.

Tasks: Click Add to enter any tasks that are to be performed
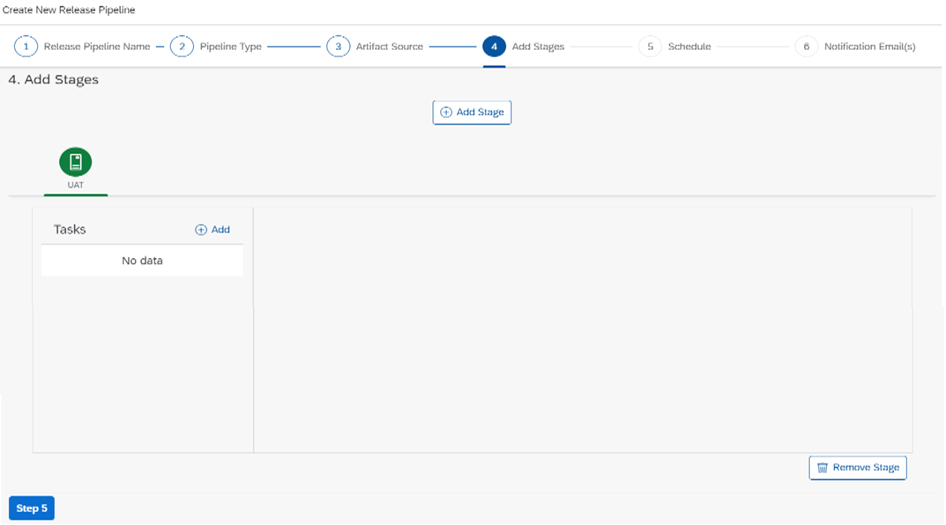
Note: To remove any stage, click Remove stage button.
Different tasks that can be added are as follows:
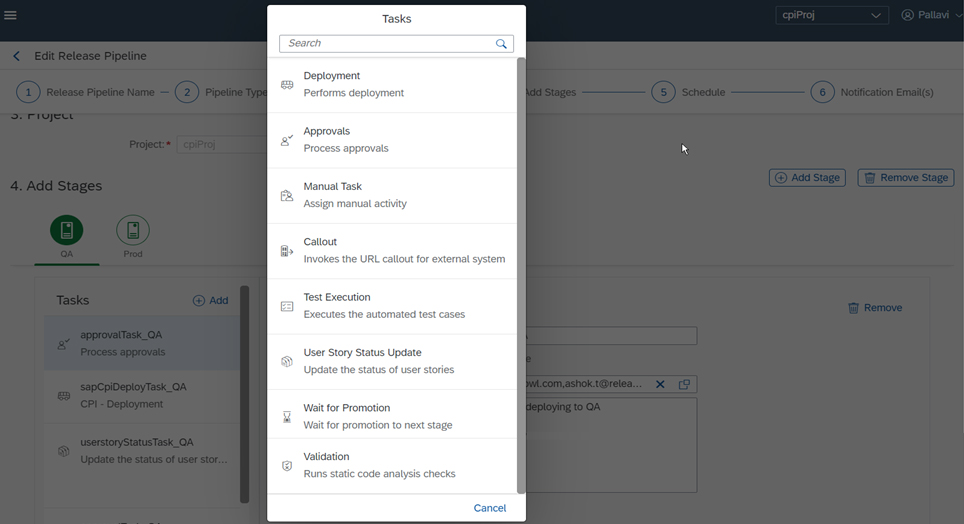
Note: All the tasks except Deployment Task are similar for any project type.
For CPI projects, Wait for Promotion and Validation tasks are the two extra tasks available other than the ones available for every project type.
Deployment Task
All the details pertaining to the deployment of the artifact is specified in the deployment task.
The following screen is displayed on adding a deployment task.
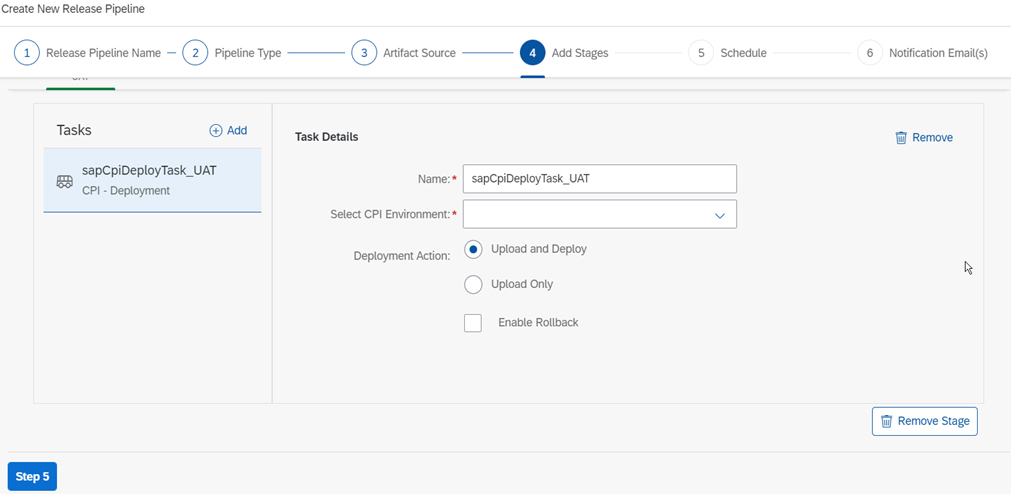
The various Deployment Actions that can be performed are as follows:
| Upload and Deploy | CPI Artifacts are uploaded to design time of the destination environment and published to runtime. |
| Upload Only | CPI Artifacts are uploaded to design time of the destination environment. |
| Enable Rollback | This will create a backup version of the destination artifact so that you can rollback later. |
Wait For Promotion Task
In general, pipeline will execute the configured tasks sequentially one after the other.
Wait For Promotion task will be used to stop the execution of the task automatically in the next stage and wait for manual promotion once the user is ready to promote it to the next stage.
Tasks waiting for promotion at the same stage of the pipeline can be packaged together as a Release Package and can be promoted to the next stage in the Release Pipeline.
Promotion
Promotion is the process of Moving/Deploying CPI Artifacts to various environments using a Release pipeline associated with the project.
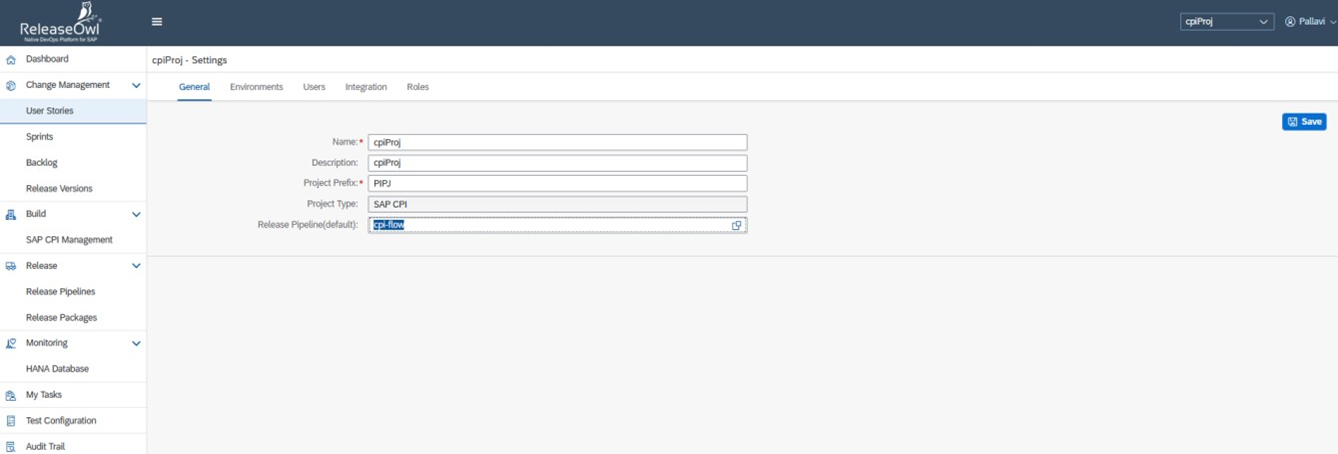
Pre-requisite for the promotion to work is that every stage in the Release pipeline should end with “Promotion Task”. Promotion can be performed in two ways – via User Story and via Release Package.
a) Promotion by User story
1. From Actions Menu of the User story, promotion can be done.
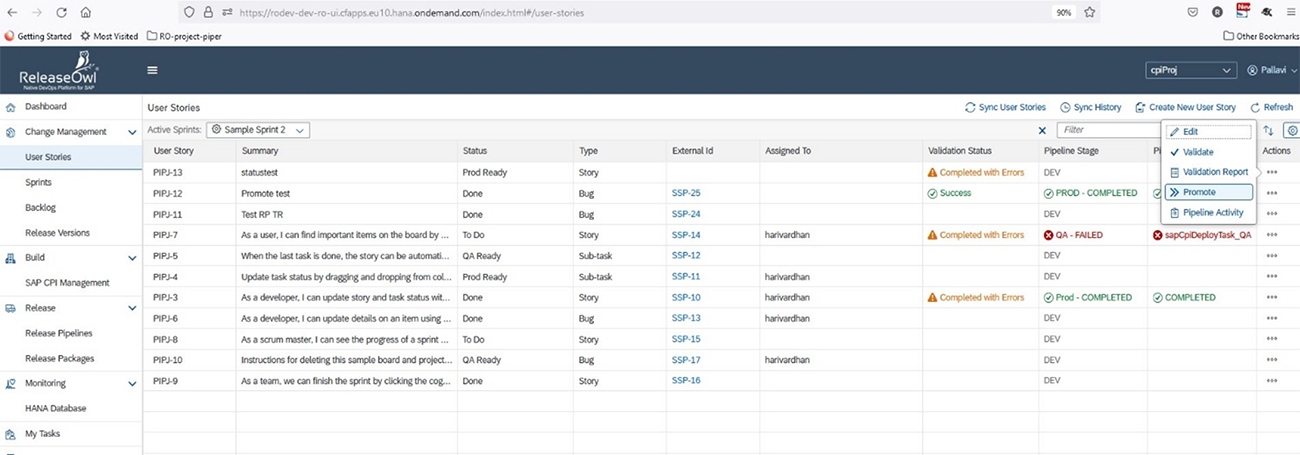
2. Clicking Promote will Trigger the Release pipeline associated with the project.
3. The column “Pipeline Stage” shows the current stage in the Release Pipeline execution and status of the Release Pipeline.
4. The column “Pipeline Status” shows the current task in the stage or overall status of the Release Pipeline.
5. Runtime view of the pipeline can be viewed using “Pipeline Activity” menu option in the Actions Menu.
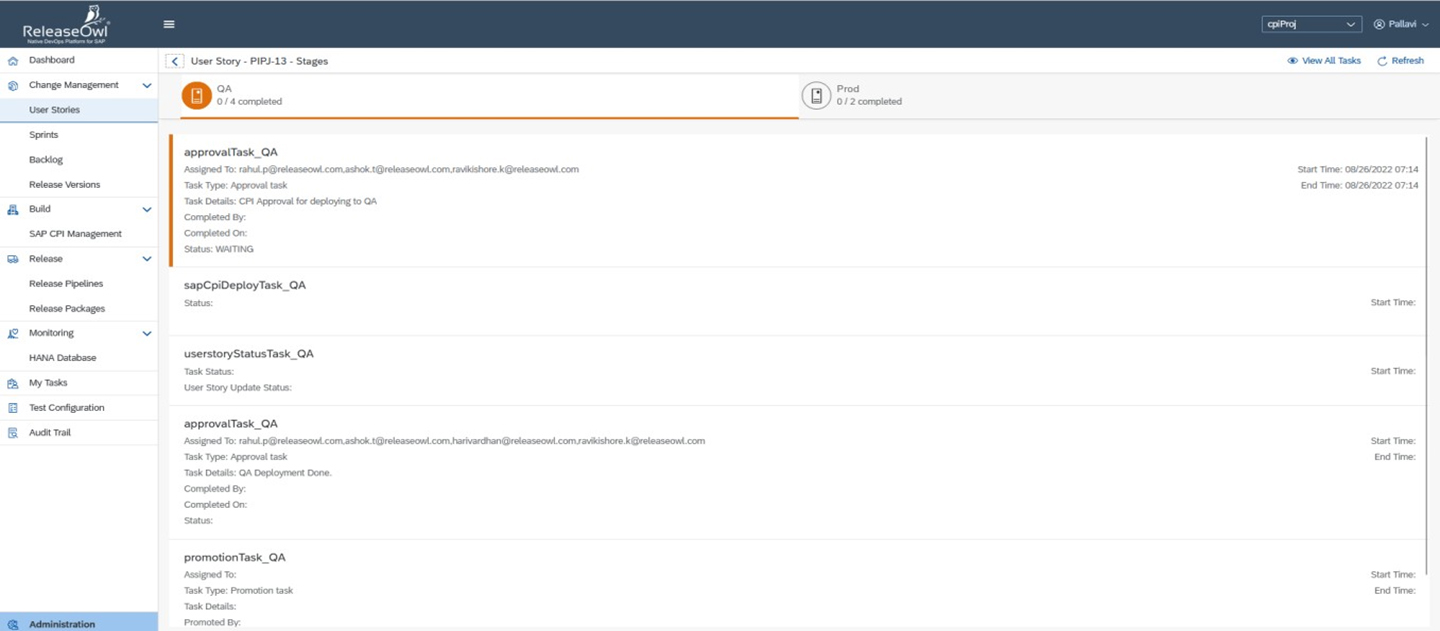
6. The pipeline activity screen shows all the stages of the Release Pipeline. Clicking on the stage shows the tasks and it’s execution status.
7. Once Pipeline execution reaches the “Promotion Task” Pipeline will continue to wait until further promotion from the User Story or Release Package.
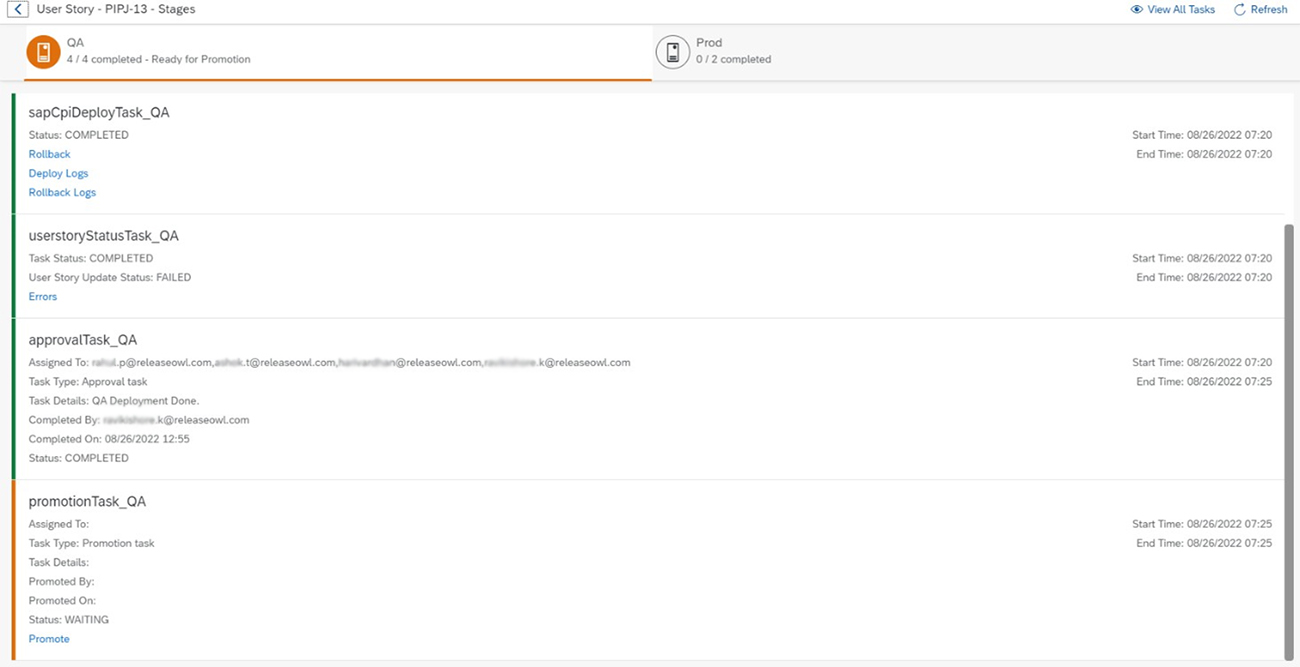
8. User Story can be promoted to next stage (in this case, Prod) or a new Release Package can be created with all the User Stories waiting in QA stage for getting promoted to Prod.

b) Promotion by Release Package
Release Package is a logical grouping of user stories that are to be promoted as a single unit instead of promoting each user story separately.
If Start stage is mentioned in the Release package, then only user stories with current stage same as the one specified in the Release Package are eligible for promotion.
It uses the Release Pipeline associated with the project for promotion.
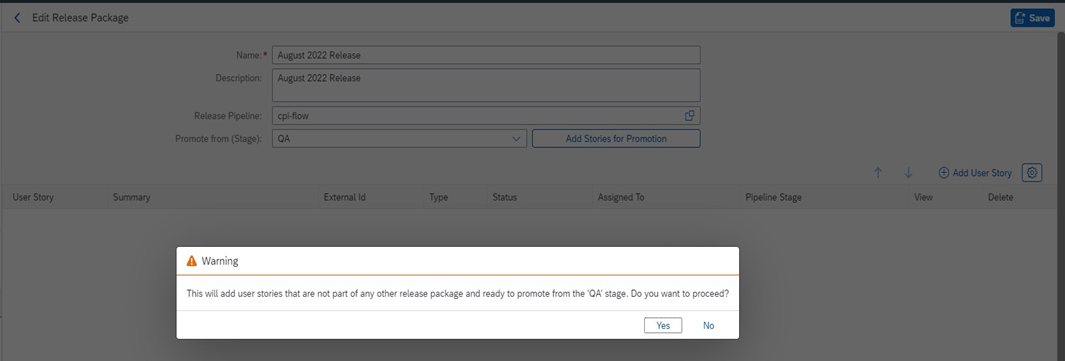
1. Clicking on “Add stories for promotion” will add all the user stories eligible for promotion.

2. From the Action Menu of the Release package, click on “Promote”.

3. Execution of the Release package can be seen using the option “Pipeline Activity”

4. Once Promotion for Release package starts then the Release Package will be locked and no changes are possible like addition of more user stories.

5. User has to unlock Release Package to backout any of the user stories after promotion. In role permissions, user should have Unlock Release Package permission.
Validation Task
Validation task is added to perform Static Code Analysis checks and generate the validation report to view the errors encountered.
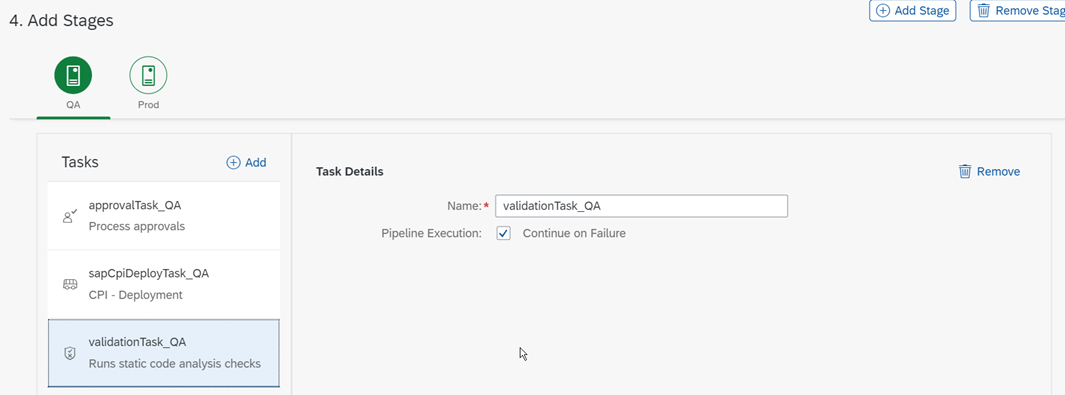
You can continue the execution of the pipeline even upon failure by checking the checkbox – Continue On Failure by fixing the errors seen in the log and re-running the release pipeline.
The validation report gets generated irrespective of the pipeline execution status - whether success or a failure.
5. Schedule: You can execute a Release Pipeline either manually or can schedule it to get executed automatically once its reference build pipeline gets executed successfully.

6. Notification Emails: You can specify an email distribution list separated by comma who you want to notify the result of the Release Pipeline Execution – either Success or Failure.

Note: If the Release Pipeline fails, the logs are also attached in the notification email.
By default, the user who creates the Release Pipeline is notified and specifying the distribution list is optional.
Multi-Stage Release Pipeline
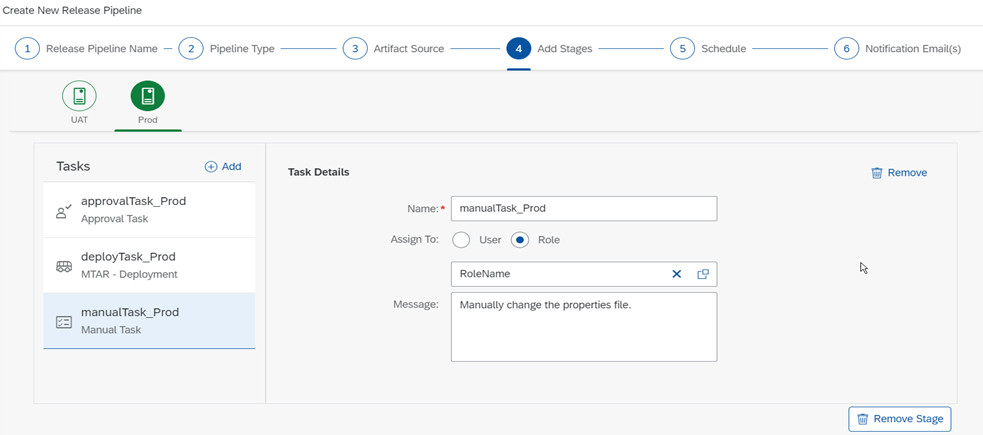
Any number of stages can be added while creating a release pipeline. An existing release pipeline can also be edited to include various stages.
This is required when we want the deployments to take place in multiple environments one after the other continuously which is a part of Continuous Delivery.
For each stage, the tasks are to be added separately. This corresponds to the tasks that are to be performed in that particular environment for the deployment to take place and the required actions that are to be taken.
Editing/ Deleting Pipeline
Go to the required pipeline and click Edit to edit the pipeline or Delete to delete the pipeline.
Running a Release Pipeline
Once a release pipeline is created, you can run multiple iterations to deploy MTAR artifacts.
To run a release pipeline:
1. Once you create a release package, go to Release and click Release Pipeline.
2. Choose the required release pipeline to be run and click Run.

3. A pop-up appears. Enter a Cycle Name and Select Release Package from the drop down.
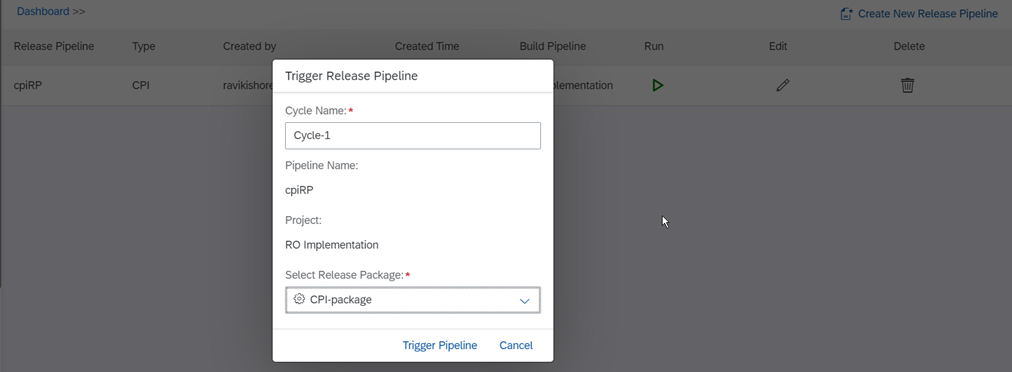
4. Click Trigger Pipeline. A message is displayed, about successful triggering of a release pipeline. Click OK. The following screen is displayed:

5. Click Refresh. Click on the required build to view a list of the triggered cycle.


Click on the required cycle to view its details.
Rollback
Rollback is available for CPI artifacts that are deployed to design time in addition to those published to run time. To rollback a build, click Rollback in the status page.
While creating a release pipeline, you must enable the option to rollback as a prerequisite.
Click rollback in the deployment screen to rollback while running release pipelines.
In the confirmation pop-up that appears, click Yes. Rollback process starts.

Rollback Logs
Rollback Logs are available for CPI artifacts that are deployed to design time in addition to those published to run time. To rollback a build, click Rollback in the status page.
Once rollback is enabled, you can see the rollback= status in the deployment logs.

Display Logs
Click Display Logs to view the logs of the current release pipeline.

